You finally launched your Shopify store. Products are live. The theme looks good. Then you see “schema markup improves SEO” everywhere… and now you’re stuck wondering what it is and where it goes.
Schema markup can help Google better understand your pages and sometimes unlock nicer search snippets (like prices, stock, FAQs, or breadcrumbs). But it’s not a magic switch that instantly boosts rankings.
In this guide, I’ll show you how to add schema markup in shopify. You’ll also learn how to add it to the right spot in Shopify (without breaking your theme) and test it to make sure it’s working.
What is Schema Markup?
Schema markup is basically extra labels you add to a page for Google. It tells search engines what the page is about in a clear, structured way. So instead of Google “guessing” what a product name is, what a price is, or what’s in stock, schema spells it out.
When people say “structured data,” they’re talking about those labels in a specific format that machines can read. In Shopify, this usually appears as a small JSON-LD block in your theme files. Your customers won’t see it on the page, but Google can.
The biggest beginner misunderstanding is thinking that schema is an instant SEO hack. It’s not.
Schema doesn’t automatically push you to page one. What it can do is help Google better understand your content. It can lead to better-looking search snippets (and sometimes more clicks).

What Schema Actually Improves on Shopify
Schema doesn’t “optimize” your store in the way people hype it up. It mainly helps Google understand what your Shopify pages mean.
So, Google has a better chance of showing cleaner, richer search snippets. On Shopify, the biggest improvements usually happen on:
- Product pages: Google can clearly read your product name, price, currency, and whether it’s in stock (and sometimes ratings, if you have real reviews shown on the page).
- Blog posts: Google can understand “this is an article” (title, author, publish date), rather than treating them like random pages.
- Breadcrumbs: Google can show a cleaner path in search results (like Home -> Collection -> Product), which looks cleaner and builds trust.
- Brand info: Google can connect your store name, website, and logo properly using Organization/Website info.
Before You Add Anything: Shopify Reality Check
Before you start adding schema, pause for a second. Shopify stores often already have schema coming from the theme or an app. And adding more without checking can create a bigger mess.
Your Theme Might Already Include Schema
A lot of Shopify themes already add basic schema automatically (especially newer ones). So before you add anything, assume it might already be there.
Why it matters: If you add the same schema again, you can create duplicates. And duplicates can cause Google to ignore the markup or display warnings in testing tools.
Apps Might Already Be Injecting Schema
Many SEO/schema apps add JSON-LD across your store for you. That can be helpful. But here’s the problem: if your theme already outputs schema, adding an app often means you now have two versions of the same thing.
That’s why “install another schema app” can backfire. It stacks schema instead of improving it.
The #1 Beginner Trap: Duplicate Markup
This is the classic mess:
Theme schema + schema app + manual schema you pasted from a guide.
When that happens, Google can see conflicting information (such as different prices, stock status, or product details). And instead of helping you, schema becomes something you have to fix.
A good practice to follow is not to stack schemas. Check what exists first, then improve or replace.
Quick 60-Second Check: Do You Already Have Schema?
Before you add anything, do this quick check. It saves you from the #1 beginner problem: adding schema twice.
- Open any product page on your store (not the homepage).
- Right-click anywhere → click View page source.
- Press Ctrl + F (or Cmd + F on Mac) and search for: ld+json
If you find it, that means your store is already outputting structured data somewhere.
Now, what you’re looking for inside those ld+json blocks is the type. You’ll usually see something like:
- Product (product details like name/price/stock)
- Organization or Website (your brand + site info)
- BreadcrumbList (breadcrumb path like Home → Collection → Product)
If you already see a Product schema on your product page, don’t paste another Product schema from a random tutorial. Instead, your job is to improve what’s already there (or replace it cleanly) so you don’t end up with duplicates.
What Schema Types Beginners Should Start With
You don’t need every schema type under the sun. For a brand-new Shopify store, a few key ones do most of the work. Here are the schema types worth knowing, in the order most beginners should consider them.
Product Schema
This is the big one for Shopify. A product schema tells Google, “Hey, this page is a product,” and provides the important details. These details include things like product name, price, currency, and whether it’s in stock.
If you only do one schema type, do this. Just make sure it’s only on product pages, not sitewide. And watch out for variants as Shopify products often have multiple prices/stock statuses.
Organization + Website Schema
This one is about your brand identity. It tells Google who you are (your store name), what your site is (your website), and key details like your homepage URL and logo.
It won’t make your product snippets magically richer, but it’s a great “foundation” schema. It helps Google connect your store info consistently across pages.
Article Schema (If You Blog)
If you publish blog posts, the article schema helps Google understand, “This page is a blog article,” instead of treating it like a random page. It can also pull basic details like your headline/title, author name, publish date (and sometimes the featured image). This helps Google display and categorize your content more accurately.
The key is to use it only where it fits: real blog posts. Don’t add Article schema to your homepage, product pages, or collection pages.
Breadcrumb Schema
A breadcrumb schema helps Google show a clear path in search results. For example, it shows Google the navigation like: home to collection page, and collection page to product page.
It’s not required, but it can make your snippets look cleaner and give shoppers more context. Just keep breadcrumbs sensible in Shopify, since products can belong to multiple collections.
FAQ Schema (Only if FAQs Are Visible on the Page)
The FAQ schema is used when you have real FAQs displayed on a page. Sometimes Google can show those questions/answers right in search results.
The main rules here are that the FAQs must be visible to visitors on that page. If you try to add FAQ schema for questions that aren’t actually on the page, it’s not worth the risk.
Review Schema (Only if Reviews Are Real and Visible)
The review schema powers star ratings and review counts in product results (when eligible).
But this is a common duplicate problem because review apps often already inject the review schema. So if you’re using a reviews app, you need to check what it’s outputting before you add anything manually.
Localbusiness Schema (Only if You Have a Real Physical Location)
The LocalBusiness schema is only worth adding if people can actually visit you in real life (e.g., a storefront, showroom, or office with public hours).
It helps Google understand your address, opening hours, phone number, and business type, thereby improving local visibility.
If your Shopify store is online-only and you don’t serve customers at a public location, skip it. Adding LocalBusiness when you don’t have a real location can just create confusion.
Variant / Product Group Modeling (Advanced, Don’t Start Here)
This is the deeper version of product schema, where you model variants more explicitly (sizes, colors, different offers). It can be useful for stores with lots of variants and variant-specific pricing/availability.
But it’s also easy to mess up, and beginners often end up with confusing “offer” data or duplicate markup. Get the basics working first, then level up later.
If you want the simplest “starter setup,” start with the Product schema and the Organization/Website schema. Then the test. After that, add breadcrumbs, articles, and FAQ only where they make sense.
Choose Your Setup Method (Beginner Decision Guide)
Alright, before we start adding anything, you’ve gotta pick how you want to do this. And no, there isn’t one “right” option. It depends on what you’re comfortable with.
Here are the 3 real-world ways beginners do schema in Shopify.
Method A: Use an App (Fastest)
If you want the quickest “turn it on and move on” setup, an app is the easiest path. It’s popular with beginners because you don’t need to edit theme files. You can usually enable Product schema in a few clicks.
The catch is: apps can accidentally add a schema that your theme already has. It creates duplicate markup and messy results.
Method B: Add Schema Manually (Best Control)
Manual setup is best when you want a clean, lightweight solution. And you’re okay with copying/pasting a small code block into the right theme file.
You don’t need to “be technical,” but you do need to follow the steps carefully. The big upside is control: you decide exactly what’s added, and you’re not relying on an app’s output.
Method C: Use a Custom Liquid Block (Middle Ground)
Custom Liquid is great when you only need schema on a specific page, such as an FAQ page, About page, or landing page. It’s less scary than editing theme code because you’re pasting the markup inside Shopify’s editor.
It’s not ideal for Product schema across your whole catalog, but it’s perfect for “one page” schema without going deep into files. Just keep a note of what you added, because Custom Liquid blocks are easy to forget and can lead to duplicates later.
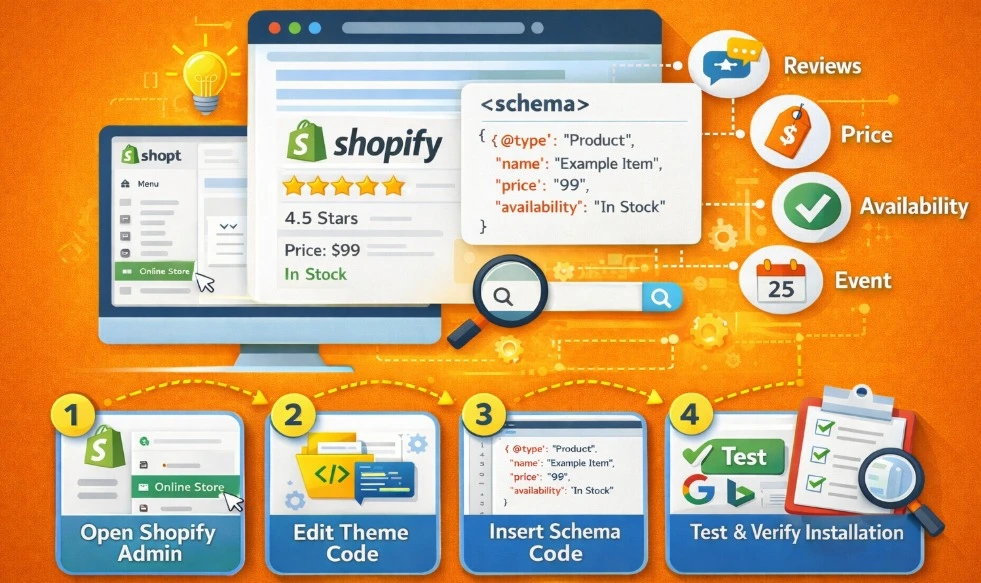
How to Add Schema Markup in Shopify: 7 Different Types of Methods
You don’t need every schema type – just the ones that match your store pages. Here are the 7 most common Shopify schema setups and where to add each one (without messing up your theme).
1. How to Add Sitewide Schema (Organization + Website)
This is the “set it once and forget it” part. You’re basically handing Google your store’s ID card: who you are (brand name) and what site this is (your website + logo). It won’t instantly boost rankings, but it helps Google connect your brand info across every page.
Because this schema should appear everywhere, you add it in one place: your main theme layout file. In Shopify, that’s theme.liquid, and the exact spot you want is inside the <head> section (the part that loads on every page).
Here’s how you can do it:
- First, duplicate your theme (so you have a backup). Go to Online Store → Themes → click the three dots → Duplicate.
- Next, check if your theme already outputs schema. Open your homepage, View page source, and search ld+json. If you already see Organization/Website, don’t paste another copy yet.
- Now go to Online Store → Themes → Edit code → Layout → theme.liquid.
Find </head> (Ctrl+F / Cmd+F helps). Paste your Organization + Website schema block just above the </head> tag. - Save, refresh your homepage, and View page source again. Search ld+json to confirm your brand name/URL shows up.
- Once that’s done, you’ve got the foundation in place. Next, you’ll add the Product schema, which is most likely to affect how your product pages appear in Google (price, stock, etc.).
2. How to Add Product Schema (The Main Event)
This is the schema that actually moves the needle for most Shopify stores. Product schema tells Google, “This page is a product.” It provides the key details people care about in search, such as price and in-stock/out-of-stock status. When it’s done right, your product pages are more likely to show cleaner, more helpful snippets.
At a minimum, the product schema should include: product name, main image, price + currency, availability, and the product URL. Keep it simple at first. The main goal is that the schema matches what a shopper sees on the page.
Here’s how to add product schema:
- First, open one product page and do the quick check: View page source → search ld+json. If the product schema is already there, don’t add a second one – fix or improve the existing one.
- If the product schema isn’t there (or it’s clearly incomplete), add it inside your product template/section (not in theme.liquid). This is usually in the file that controls product pages, often named something like main-product.liquid (theme names vary).
- Keep the first version simple: name, image, price, currency, availability, URL. Save.
- Test the product URL in a rich results/schema testing tool to confirm Google can read it and that the values match the page.
- Once one product page is clean, repeat the test on a second product page. If both look good, you’re ready to move on to the next schema type.
3) How to Add Article Schema (For Blog Posts)
The article schema is for one job: telling Google “this page is a blog post.” That’s it. It helps Google read your post as an article (not a product page, not a random page). And pull basic details like the title and publish date correctly. The key is placement: Article schema should appear only on blog posts.
- First, open one of your blog posts and check if your theme already adds it. Right-click → View page source → search for ld+json. If you see an Article (or BlogPosting) block already, don’t add another one.
- If it’s missing, add the article schema in the blog/article template section (the file Shopify uses for blog posts). This is important because you want it applied automatically to all blog posts, without having to paste anything page by page.
- Keep the first version simple. Your minimum fields should be: headline/title, publish date, author name, and URL
- Save, reload that same blog post, and check the page source again (ld+json). If you can see your title/date/author inside the Article schema block, you’re good to move on.
4) How to Add Breadcrumb Schema (Optional, But Nice)
Breadcrumb schema helps Google understand your page structure. So, it can show a cleaner path in search results – something like Home → Collection → Product. It’s not a “must-have,” but it can make your snippet look more organized and trustworthy.
The Shopify catch is this: products can belong to multiple collections. So if you blindly generate breadcrumbs, you can end up with weird paths. Or even in different breadcrumb paths on the same product, depending on how someone reached it. That’s exactly how breadcrumb schema turns into a mess.
Here’s the beginner-safe move: keep it simple and consistent. Aim for a breadcrumb trail that looks like this: Home → (one main collection) → Product.
- First, check if your theme already includes breadcrumb schema. Open a product page → View page source → search BreadcrumbList or ld+json. If it’s already there, don’t add another one.
- If it’s missing, add breadcrumb schema only on the pages where it makes sense (usually product pages, sometimes collection pages).
- Pick one collection to use as the breadcrumb parent. Don’t try to include every collection the product belongs to.
- After saving, test a product page again and make sure the breadcrumb path looks clean and doesn’t change randomly from one visit to the next.
5) How to Add FAQ Schema (Only If FAQs Are Visible)
The FAQ schema is for pages where you already have a real FAQ section. It tells Google, “These are the questions and answers on this page.” Sometimes, Google will show them right in the search results. Nice bonus… but only if you do it the right way.
The rule is simple: the FAQs must be visible on the page. If the questions and answers aren’t actually shown to visitors (or you’re adding “fake FAQs” just for SEO), don’t do it.
Here are the step by step way of adding the FAQ schema:
- First, confirm the FAQs are actually visible on the page (not hidden behind tabs that never load, not only in an accordion that doesn’t render content properly).
- Decide where you’re adding it: Custom Liquid for one-off pages, or the template/section if the FAQ appears on many pages.
- Add the FAQ schema and save.
- Re-check the page source (ld+json) and make sure your questions/answers appear there.
- Keep it tidy: only include FAQs that are truly on that page, and don’t repeat the same FAQ schema block multiple times.
6. How to Add Review Schema (Only If Reviews Are Real + Visible)
Review schema is the markup that can help Google understand your product reviews – things like star rating and review count. When it shows up in search results, it can make your product look way more clickable. (Big “when” though: Google decides if it will display it.)
Here’s the Shopify gotcha: most stores use a reviews app, and a lot of those apps already inject review schema automatically. So if you copy/paste review schema from a guide and add it on top, you’ll often create duplicates fast.
And duplicate review schema is one of the easiest ways to end up with confusing errors or ignored markup. The beginner-safe approach is simple: check before you add.
- Open a product page that displays reviews.
- View page source and search ld+json. Also search for AggregateRating or review.
- If you already see review markup in the code, don’t add another review schema block. You’ll want to adjust what exists (or let the app handle it).
- Only add review schema if your reviews are actually visible on the page and you’re sure nothing else is outputting it.
- After any change, re-check the page source to make sure you now have a single, clean review schema set up – not two competing versions.
- If you’re using a reviews app, this section is basically about avoiding the #1 mistake: stacking review schema without realizing the app already did it.
7) How to Add LocalBusiness Schema (Only If You Have a Real Location)
The LocalBusiness schema is only for stores that people can actually visit in person. Think: a storefront, a showroom, a clinic, a studio, or an office with public hours. If that’s you, this LocalBusiness schema helps Google understand:
- Your address
- Your opening hour
- Your phone number
- Your Business type
If you’re online-only and you don’t have a public address customers can visit, then skip it. Adding LocalBusiness anyway can send mixed signals to Google. Here’s how you can add localbusiness schema:
- First, confirm you have a real public location with a consistent name/address/phone details.
- Make sure your address + hours are visible on the page you’re marking up (don’t hide them).
- Add LocalBusiness schema sitewide or on your Contact/Location page (where the info lives).
Save, then check the page source (ld+json) to confirm it’s showing once, and the details are correct.
Test Your Schema (So You Know It Works)
Once you add a schema, don’t just hope it’s working. A 2-minute test can save you hours of “why isn’t Google showing anything?” later.
Start with a real product page (not your homepage). Pick a product that’s live, public, and easy to recognize. So, you can quickly spot if the name, price, or stock info is wrong.
Now paste that product URL into Google’s Rich Results Test and run it. If Google can read your schema, you should see Product show up in the results.
Click into it and check the basics: product name, image, price + currency, availability, and URL. These should match what your shopper sees on the page.
While you’re there, keep an eye out for duplicates. If the test shows more than one Product schema, that usually means your theme and an app are both adding schema. You want one clean version, not a pile.
Finally, repeat the same test on a second product page. If product 1 passes, but product 2 throws errors. That’s a hint you’ve got a variant or template issue to fix before moving on.
Common Shopify Schema Mistakes (And How to Fix Them)
Two quick truths before we get into mistakes: Shopify schema isn’t “hard,” but it is easy to mess up with one bad paste. And most schema problems aren’t “Google problems” – they’re setup problems you can fix in minutes.
- Pasting schema in the wrong file: If you paste the Product schema into the theme. liquid, it shows up on every page (home, collections, cart). Fix: theme.liquid is for Organization/Website only. Product schema goes only in the product template, and Article schema only in the blog template.
- Adding Product schema to non-product pages: Sometimes Product schema “leaks” because it’s added to a section used on multiple pages. Fix: add Product schema only to the product page template/section. Then quickly check the source of the collection page to make sure the Product schema isn’t there.
- Copy/paste JSON errors: One bad comma or curly quote can break the schema, and Shopify won’t warn you. Fix: copy from a clean source, don’t edit much, and test the page right after saving.
- Theme/app duplicates: Your theme adds schema, your app adds schema, then you add schema again. Google may see duplicates and ignore them. Fix: pick one source (theme or app) and remove/disable the others.
- Changing themes later and losing schema: Manual schema edits live inside your theme files, so a new theme can wipe them out. Fix: keep a quick note of what you added, and re-test a product page right after any theme change.
Frequently Asked Questions (FAQs)
People always end up asking the same questions when they start adding schema in Shopify. These questions are common guides that make it sound way more complicated online. Here are the most common ones, with clear answers.
No. Your store can rank without it. But adding basic Product schema + Organization/Website schema early is a smart “set it once” win.
For most beginners, an app is safer because it’s harder to break code. Manual is safe too, but only if you copy/paste carefully and test right after.
Most of the time, you don’t paste HTML into Shopify pages. Shopify schema is usually added as JSON-LD in your theme (or in a Custom Liquid block). If a tool gave you HTML, it’s not the best format for Shopify.
Usually, no. You add schema once in the product template, and Shopify fills in each product’s name, price, stock, etc. You only edit per product if you’re adding special custom details (like metafields).
Then don’t stack more. First, check your page source (ld+json). If the product schema is already there, either improve the existing one or disable the app/theme version.
Need a Shopify Team That Handles It All?
Brands Bro helps Shopify brands get unstuck and start growing again. We do the work that actually moves things forward from SEO, PPC, development, to conversion optimization. So you can drive more traffic, run a faster site, and turn more visitors into customers.
If you feel like you’re doing “all the things” but growth is still flat, we’ll find what’s blocking you and fix it. And if you’re serious about growth and want a team that can plan and execute, reach out and book a call.


